Harvesting Rainwater
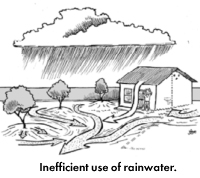 When the Monsoon clouds come and the humidity is soaring watch the rain activity around your landscape. What direction is the runoff? Where are the puddles forming? Are there areas of erosion? Historically, people relied on harvested rain water to provide water for drinking, landscape watering, and for agricultural uses. Centralized water supply systems have replaced the need to harvest water. We are encouraging people to come back to water harvesting. It is one of the oldest known gardening methods, dating back to the beginnings of agriculture. In fact, water harvesting is still used by the Tohono O’odham and Hopi tribes.
Simply put, water harvesting is the capture, diversion, and storage of rainwater for plant irrigation and other uses. It is very useful in providing water for home garden landscapes featuring desert-adapted plants.
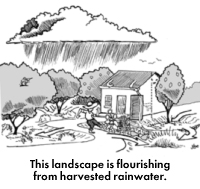 Many methods are available to harvest rain water for landscape use, some that are inexpensive and easy to construct. All you need to get started is rainfall and plants that require irrigation. It can be as easy as capturing runoff from rooftops and storing water in a barrel for later use. Small berms and drainages can be built to direct water to a row of trees. Crescent-shaped berms can be constructed around the base of the plant on the down-hill side on slopes for slowing and holding water. Small changes like this will help you re-contour your yard for more efficient water harvesting.
There are many benefits to harvesting rainwater. Rainwater harvesting is an effective water conservation tool because it provides “free” water. It also reduces off-site flooding and erosion by holding rainwater on the site. Rainwater is a clean, salt-free source of water for plants. When collected, rainwater percolates into the soil, forcing salts down and away from the root zone area. This allows for greater root growth and water uptake, which increases the drought tolerance of plants. Try it! Start simple and expand. You will be pleased with the results.
Here’s a detailed reference:
Railroad Ties in Playgrounds
The Arizona Register of Contractors requires a Playground Contractors License for installation. It is important to note that playground maintenance is not regulated in the State of Arizona. It is up to the individual community to make decisions best for their children. CareScape has Certified Playground Safety Inspectors to give advice and help you keep your children safe.
The word is Do NOT use railroad ties where your children are going to be playing! Creosote treated wood from fences, bridges, railroad ties, or telephone poles are not recommended for use in playgrounds. Children who play on soil contaminated with creosote have more skin rashes than children playing on non-contaminated soil. Apart from this, health effects of creosote have not been extensively studied in children. In adults, creosote causes irritation of the respiratory tract, and long-term exposure to low levels of coal tar creosote can cause skin damage such as peeling. Direct long-term exposure to creosote has been correlated with skin cancer and cancer of the scrotum. Calling creosote a possible human carcinogen in 2007, the EPA has a list of warnings about its use. These cautions apply to railroad ties decommissioned by the railroads and reused by humans for landscaping, playgrounds, gardens, and on farms. Additionally, landscape timbers and lumber treated with chromate copper arsenate (CCA) as a protection against weather, mold, and insects, has been phased out, but such lumber made before 2004 could still contain high levels of CCA, which is dangerous because the arsenic in it is a known carcinogen.
When choosing the type of border you want for a playground, you should consider safety, cost, and aesthetics. Fortunately, there are enough border materials available for just about any playground need. Alternatives to creosote and CCA treated lumber include untreated redwood or cedar, which are naturally decay resistant and sustainably harvested. Composite lumber made from sawdust and recycled plastic is another option. There are 9″tall playground & landscape borders that are made with recycled plastic and Manufactured in the USA. These maintenance free borders will not rot, splinter, crack or decay like treated wooden borders will over time. They are environmentally friendly to the soil and are insect resistant. There are no sharp corners or edges which offer greater protection against children hurting themselves.
Plastic playground borders are gaining favor because they don’t need maintenance, keep loose playground surfacing in place well, and are extremely durable. There are also recycled plastic landscaping timbers with hinged joints to accommodate unusual shapes. Rubber Playground Borders made of recycled rubber can be used to follow curves in a design that straight plastic or wood timbers cannot.
Contact our CareScape Playground team to help you with your playground needs.
Natural Paint for Citrus
There’s a good reason for painting the exposed bark of citrus. The bark is particularly sensitive to sunlight, and the paint reflects the ultraviolet rays that can cause sunburn resulting in cracking and peeling.
- If you expose trunks or limbs during pruning, it is important to protect the exposed areas.
- Citrus trees are actually shrubs and the branches naturally grow low to the ground shielding the bark. Homeowners like to prune them up, which, unfortunately, exposes the thin-skinned trunk and branches to the damaging rays of the sun.
- When frost damage occurs some trees have been completely defoliated leaving trunks open to sunburn. The canopies sometimes return, but usually not thick enough before the heat of summer returns.
- Most smooth bark trees (such as Ash) growing in the low desert need protection from the hot sun as well, particularly with the afternoon sun.
We recommend painting with a whitewash or half-strength latex paint. Unfortunately, white trunks stick out like sore thumbs in the landscape. There is now an alternative. Go Natural paint was developed by Chuck Robbins, a former citrus-grower in Mesa, Arizona. Formulated to match the natural color of citrus bark, the paint provides the same ultraviolet protection as white latex but lasts longer. You can use it to coat other thin-barked fruit trees such as peaches, and it will also protect the bark of young landscape trees. Like any latex paint, you can apply it with a brush, roller, or sprayer, and it cleans up in water.
It is important to note that according to many tree experts, once a tree begins to compartmentalize it is too late to help. Paint should be applied at planting or before damage occurs to prevent sunburn.
Trunks can also be wrapped with protective trunk wrap materials. One option for this is window screen material. It breaths, shades, and it does not store heat. It can be single or double wrapped.
Our CareScape ArborCare would be pleased to assist you with your tree needs.
Here’s a detailed reference:
Palms (Pruning)
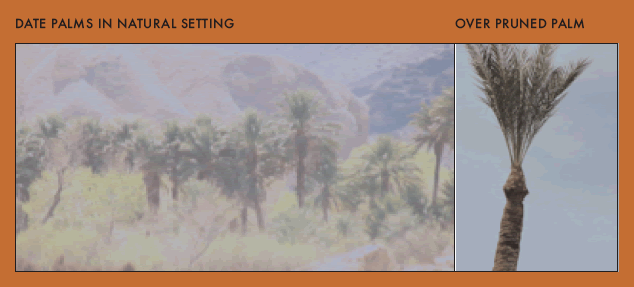
Pruning palms is one of the most misunderstood aspects of palm culture. It is very common to see landscapes indiscriminately hack at palms. Skinning palms has also become popular. For some reason they believe they can periodically remove most of the fronds and not harm the tree. This is not true.
All green fronds produce the food needed to grow properly, in order to produce a healthy palm. The reduction of the green leaf area reduces food production, and in turn, the health and growth of the palm is placed in jeopardy. When green fronds are removed on a regular basis, the health and vigor of the palm is compromised. Uninformed pruners may want to remove all of the leaves they think are in the way, but make sure as many green fronds as possible are left.
A good rule of thumb is to never prune off more of the palm’s leaves in one year than are produced during that time. If at all possible, only remove yellow or brown fronds. We recommend at least two rows of mature fronds should be left on the palm. Mature fronds are those found below the current year’s flowers.
Also, many arborists use climbing spikes when pruning palms. This is not recommended for the health of the tree as spikes can damage the trunk. Ladders, non-spike climbing gear, and hydraulic lifts should be used.
Trees (Planting)
Planting trees can take place any time throughout the year. It is important first to take a good look at the location you have chosen. Is there enough room for proper development of the tree canopy and roots? Are you putting the right tree in the right place? Are you too close to utilities, buildings or sidewalks? It’s important to call 1-800-STAKE IT 48-72 hours before digging. Blue Stake will locate the underground wires and mark them with paint.
Prior to planting, perform a percolation test by digging a hole and filling with water. If the water drains less than 1” per hour, you may need to dig through the underlying hardpan. It is common to run into layer of hardened calcium carbonate called caliche in our desert soils. It is impenetrable, preventing the movement of water. You will need to drill through this layer on either side of the planting area to allow for drainage. Locate existing irrigation or install the needed irrigation to insure proper watering.
Shallow is better than deep when it comes to digging a hole. A hole 3 times the diameter of the root ball it recommended. The larger the hole the greater anticipated root growth. The depth of the hole should be less than the height of the root ball about 10% especially in compacted or clay soils. Pre wetting soil will help to keep the plant alive the first day.
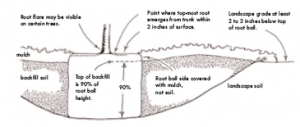
Find the trunk flare (root flare, root crown). The flare is the swelling where the roots join the trunk.
Remove soil and planting media until the top of the root ball is visible. Often soil and mulches are several inches deep in the top of containers. Gently press on the container to remove and place root ball in hole. Make 2-4 slices about ½ inch deep from the top to the bottom of the container. The roots will regrow into the backfill. Girdling or circling roots need to be cut with a knife especially at the bottom.
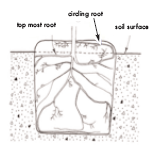
Place the root flare slightly above the soil surface. Better to plant about 10% high than level or deep. Be sure to check from all sides to see if the trunk is straight.
We recommend minimal pruning. Only remove dead or broken branches. Back fill soil using shovel blade or water to release trapped air. Cover the back fill with mulch at least out to the drip line, 2” if rock, 3-4” if organic. Stake the tree only if it is necessary. Primary staking is common because plants aren’t able to spread roots in nursery containers and should be considered temporary.
Sit back and enjoy your beautiful tree.
Trees (Pruning)
As a rule, growth is maximized and wound closure is fastest if pruning takes place before the spring growth flush. Heavy pruning just after the spring growth flush should be avoided as trees have just expended a great deal of energy to produce foliage and early shoot growth and pruning can stress the tree.
Pruning cycles will depend on quality of nursery stock, growth rate, climate and species and should be shorter in warmer climates. Longer pruning cycles can lead to larger cuts having to be made to correct structural issues. A suggested program would be to prune at planting, year two or three, year five or six, year ten and year fifteen.
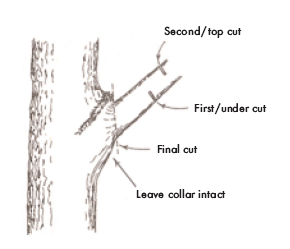
Because each cut has the potential to change the growth of the tree, no branch should be removed without a reason. Pruning cuts should be made just outside the branch collar. The branch collar contains trunk or parent branch tissue and should not be damaged or removed.
Begin by determining pruning cycle and dose to develop a permanent canopy. Prioritize trees with structural issues and then temporary vs. permanent branch management.
Pruning techniques include the following:
- Cleaning is the removal of dead, dying, diseased, crowded, weakly attached, low-vigor branches from the crown of a tree.
- Thinning is the selective removal of branches to increase light penetration and air movement through the crown. Thinning opens the foliage of a tree, reduces weight on heavy limbs, and helps retain the tree’s natural shape.
- Raising removes the lower branches from a tree in order to provide clearance for buildings, vehicles, pedestrians, and vistas.
- Reduction reduces the size of a tree often for clearance for utility lines. Reducing the height or spread of a tree is best accomplished by pruning back the leaders and branch terminals to lateral branches that are large enough to assume the terminal roles (at least one-third the diameter of the cut stem).
If a large limb is to be removed, its weight should first be reduced. This is done by making an undercut about 12 to 18 inches from the limb’s point of attachment. Make a second cut from the top, directly above or a few inches farther out on the limb. Doing so removes the limb, leaving the 12- to 18-inch stub. Remove the stub by cutting back to the branch collar. This technique reduces the possibility of tearing the bark.
There are many details to consider when pruning in addition to how the tree looks and fits within it’s environment. The short term as well as long term health of the tree should always be considered with each cut.
Citrus
Citrus trees are favored plants in desert landscaping. Hand-picked fresh citrus is a wonderful treat and easy to grow. Unlike deciduous trees, this evergreen shrub will retain the majority of its’ leaves year-round and, with proper care, will have a long life.
Growth begins in February as the weather warms and slows as the hot, dry summer progresses. A second flush occurs mid-August through October, ending with a dramatic slow down of growth during the winter months. To ensure that the variety you select will grow well in your area, we strongly suggest buying from a reputable local nursery that grows its own trees. Some varieties are hardier and require less nurturing.
The tree you select should have healthy, deep green leaves. The trunk should be straight and the tree should be able to support itself without a stake. It takes a lot of energy for a young tree to grow fruit so it is best to select a tree with little or no fruit or harvest after planting. A newly planted tree will need to conserve energy as it grows new roots and leaves.
Good cultural practices are all that is required to keep insects and diseases to a minimum. If the trees are healthy, insects are seldom a problem. Occasionally fruit can be damaged or scared, but rarely is the health of the tree affected.
Some citrus, mainly lemons and limes, can flower all year long, but the majority of flower production occurs in late February through March. Producing thousands of fragrant blossoms is nature’s way of attracting insects that pollinate the maximum number of flowers possible.
Depending on the variety, a citrus tree is capable of producing anywhere from 1 to 1000 pounds of fruit per season. Fruit will ripen over a period of 3 4 months. and should be allowed to ripen on the tree. The longer the fruit stays on the tree, the sweeter and less acidic it will be. With proper care, cultural practices, and favorable root stock, a citrus tree is capable of producing fruit in excess of 50 years.
Proper watering is essential. Mature trees watered with drip or microsprinkler irrigation should also be watered at these intervals. It is important to apply water at the canopy edge and 1 foot beyond where the roots and growing tips are absorbing water and nutrient.
| Dec-Feb | Mar-Apr | May-Jun | Jul-Sep | Oct-Nov | |
|---|---|---|---|---|---|
| 0-1mo. |
2-3 /Days
|
||||
| 2-3mos. |
3-5 /D
|
||||
| 4mo.-1yr. |
14 /D
|
7-10 /D
|
5-7 /D
|
2-5 /D
|
5-10 /D
|
| 1-2yrs. |
14-21 /D
|
10-14 /D
|
7-10 /D
|
7-10 /D
|
10-14 /D
|
| 3yrs. + |
21-30 /D
|
14-21 /D
|
14 /D
|
10-14 /D
|
14-21 /D
|
| (Adapted from Irrigation Citrus Trees, AZ 1151, by Glenn C. Wright) | |||||
Citrus are heavy nitrogen feeders and fertilization becomes necessary after a tree had been planted for 2 years. Citrus trees should be fertilized 3 times a year during January, April and August. It is important to incorporate and water when fertilizing.
Annual requirements in pounds for fertilizer after planting:
| New / 0-1yr. | 0-0.12 lbs. | Note:
|
| Young / 1-2 yrs. | 0.25 lbs. | |
| Small young / 2-3 yrs. | 0.50 lbs. | |
| Mid-size young / 3-4 yrs. | 0.75 lbs. | |
| Small adult / 4-5 yrs. | 1.0 lb. | |
| Adult dwarf /4-5 | 1.0 lb. | |
| Mid-size adult / 5-6 yrs. | 1.25 lbs. | |
| Fully grown adult / 5-6 yrs. | 1.25 lbs. | |
| Large adult / 6+ | 1.5 lbs. |
Citrus can be infected by a number of diseases. Phytoph-thora is the most serious affecting the lower plant. This fungus is present in your soil and is most active in wet, over-watered soils. Frost protection is necessary if temperatures drop below 32 degrees.


 REQUEST A QUOTE
